

Quick Answer: For important scans, keep an uncompressed or losslessly compressed TIFF master and export JPEG copies for sharing. A high-quality JPEG is a sensible smaller-file option when you do not need a large editing master. Neither format replaces a good scan or verified backups.
Choose the format for the job the file must do. A preservation master, an editable restoration project and a small family sharing copy have different requirements. Decide what each must retain, then check a real saved output before committing a collection.
The format you choose early affects what you can do with a scanned photo years later. A suitably configured TIFF preserves the saved scan pixels without lossy compression, which matters if you want to restore, enlarge or heavily edit the photo. It cannot recover detail the scanner failed to capture. JPEG compresses that data to create a smaller file, permanently discarding some of the original detail.
| Keep | Use for | Protect it by |
|---|---|---|
| TIFF master Uncompressed / LZW / ZIP | Restoration, colour work and future exports | Leave the master unchanged; edit a working copy |
| JPEG derivative Choose export quality and dimensions | Sharing, photo books and ordinary prints | Export from the master when you need another version |
| Independent backup Copy the saved files | Drive failure, loss or an accidental overwrite | Verify recovery; a second folder on the same drive is not independent |
The JPEG is an access copy, not a replacement for the master. Copying either file unchanged does not reduce its quality.
Which Format Should You Choose?
Choose TIFF for photos you want to preserve at full quality, and JPEG for photos you mainly want to view, share, or print without editing. The right choice depends on what you plan to do with the photo after scanning, not just how old or valuable it is.
Choose TIFF for a Preservation Master
TIFF works best as the copy you save and leave untouched. Choose uncompressed TIFF or lossless LZW/ZIP compression. A TIFF can also contain JPEG-compressed data, so the extension alone does not guarantee a lossless master. Lossless saving preserves the current pixels; cropping, destructive edits and enlarging can still change or discard information.
This is useful for damaged, faded or rare photographs that may need restoration later. A suitable TIFF master retains the captured information for that work; it cannot supply data missing from an underexposed, clipped or poorly focused scan.
Choose JPEG for Sharing and Everyday Use
JPEG works best for the copies you use day to day. JPEG has broad support in phones, computers, photo printers and sharing services; check the receiving service’s file-size, colour-space and pixel requirements. Its smaller file size also makes it practical for emailing relatives, posting to social media, or uploading to an online photo book service.
The trade-off is permanent: repeatedly editing and re-encoding a JPEG can add compression damage. Opening, viewing, copying or backing up an unchanged JPEG does not itself recompress it.
When Is It Worth Keeping Both?
Keeping both formats is worthwhile for any photo you would be upset to lose. Scan once, save the untouched result as TIFF, then export a JPEG copy sized for printing, sharing, or uploading online. This takes extra storage space but avoids rescanning the original later if you decide the JPEG alone was not enough.
For photos with low sentimental or practical value, such as duplicate snapshots or blurry shots, a good JPEG alone is usually sufficient.
What Changes When You Scan Negatives or Slides?
Negatives and slides need higher scanning resolutions than prints, which makes TIFF more important. Because a negative or slide is smaller than a printed photo, you need to capture more detail to enlarge or print it well. Fine detail can be affected by aggressive JPEG compression, but the visible difference depends on the content and export settings.
If you plan to send negatives to a professional digitisation service, ask whether it delivers an uncompressed TIFF as well as a JPEG. Some services offer TIFF as an add-on rather than a default. Pixoneye’s guide to the best photo scanning service covers what different providers include as standard.
A Quick Comparison of the Two Formats
| Factor | TIFF | JPEG |
|---|---|---|
| Compression | Uncompressed or lossless LZW/ZIP when selected; TIFF can also use lossy JPEG compression | Lossy |
| Typical file size | Depends on dimensions, bit depth, layers and compression | Usually smaller; dimensions and quality settings determine size |
| Best use | Preservation master, heavy editing | Sharing, printing, everyday viewing |
| Browser/app support | Limited, often needs dedicated software | Broad; check upload and print-service requirements |
| Repeated editing | Lossless saving avoids compression loss; destructive edits can still remove information | Repeated lossy re-encoding can degrade quality; ordinary file copying does not |
What Do You Gain and Give Up with Each Format?
TIFF gives you full image quality at the cost of file size and convenience. JPEG gives you small, shareable files but permanently discards some image data. Both are common outputs from scanning software, and the right choice depends on which trade-off matters more for a given photo.
How Compression Affects Image Quality
Tagged Image File Format (TIFF) supports several compression methods. Uncompressed, LZW and ZIP settings can retain the current pixel data, whereas JPEG compression within TIFF is lossy. Joint Photographic Experts Group (JPEG) files use lossy compression. The format analyses the image and removes detail the human eye is less likely to notice, according to Adobe’s comparison of the two formats.
The practical effect shows up most in fine detail and high-contrast areas, where JPEG compression can create blocky or blurred patches known as artifacts. An uncompressed or losslessly compressed TIFF avoids introducing JPEG compression artifacts during saving. A TIFF made from an already compressed JPEG retains that JPEG’s existing defects.
How File Size Affects Storage and Sharing
JPEG files are typically much smaller than TIFF files of the same photo. There is no useful universal average: scan dimensions, colour channels, bit depth, layers, image content and compression all affect storage. This size difference makes JPEG the practical choice for emailing photos, uploading to cloud storage with limited space, or sharing on social media.
Scanning a large family collection in TIFF can quickly use hundreds of gigabytes of storage. Plan your storage device or backup drive capacity before committing to TIFF for every photo.
Why TIFF Save Settings Matter
Scanning software does not treat every TIFF file the same way. Some scanners let you choose between an uncompressed TIFF and one that uses lossless compression methods such as LZW. LZW reduces file size somewhat without discarding image data.
Check your scanning software’s save settings before running a large batch. Choosing the wrong TIFF compression option, or accidentally selecting a lossy setting, can undermine the reason you chose TIFF.
Does Scanning Resolution Matter More Than File Format?
Scanning resolution and file format solve different problems, so neither replaces the other. Resolution determines how much detail your scanner captures, while file format determines how much of that detail survives saving.
What Do 300 dpi and 600 dpi Mean for a Photo Print?
For a scan, pixels per inch describes sampling along the original; scanner software often labels this dpi. A 4 × 6-inch print at 300 ppi produces 1200 × 1800 pixels, while 600 ppi produces 2400 × 3600. The larger file can support a larger print, but visible extra detail depends on the original, focus and scanner’s real resolving ability.
A low-resolution photo cannot be improved afterward by saving it as TIFF, since TIFF only preserves the detail captured during the scan.
How Do Pixel Dimensions Affect Enlargements?
Pixel dimensions, not file format, control how large you can print a scanned photo before it looks blurry or blocky. A higher sampling setting creates more pixels, but does not guarantee additional real detail or a sharp enlargement. Optical capture and source quality still set limits.
If you plan to make large-format prints from an old photo or negative, scan at a higher resolution rather than relying on file format to compensate for a low-resolution scan.
How Should You Save and Protect Your Scans?
Protect your original photos before scanning, then keep an unedited master copy. This sequence matters because early mistakes, such as damaging a fragile print or overwriting a good scan, are often impossible to undo.
Prepare Irreplaceable Originals Before Scanning
Handle old photos by their edges and avoid touching the image surface, since oils from your fingers can mark the print over time. Do not try to clean, flatten, or repair a damaged or brittle photo yourself. Improvised cleaning or heat treatment can cause permanent damage that a specialist might otherwise have avoided.
If a photo is torn, stuck to another print, or severely faded, consider using a professional digitisation service experienced in handling fragile originals rather than risking the scan yourself.
Check a Test Scan Before Digitising the Collection
Run one photo through your chosen settings before scanning an entire box. Open the resulting file and check that the resolution, colour accuracy, and saved file format are correct. Fixing a mistake on one photo is far easier than rescanning hundreds.
Adjust your scanner or software settings if the test scan looks too dark, too soft, or saves in the wrong file type. Then repeat the test until the result matches what you want for the full batch.
Keep an Unchanged Master and Export Sharing Copies
Save your first scan of each photo as an untouched master file, and never edit that file directly. Make a duplicate before opening it in editing software such as Photoshop or Lightroom. Then crop, correct colour, or restore the copy as needed.
Keep the master separately from the working export and check which file the editor is saving. A duplicate can protect against a mistaken edit, but it does not protect against losing the drive or deleting the entire folder. Keep independent recoverable copies before large batch changes.
Check Your Files and Make Independent Backups
Open a sample of your scanned files after the batch finishes to confirm they display correctly and match the photos you scanned. Copy your master files to at least one separate storage device or backup service. Otherwise, a single hard drive failure can destroy your only digital copy of an irreplaceable photo.
Keeping files synced across devices is convenient, but sync alone does not protect against accidental deletion or file corruption spreading to every synced copy. A genuine backup is a separate copy stored independently of your working files.
Save the Master You May Need Later
When your scanner supports it and the storage burden is manageable, keep an uncompressed or losslessly compressed TIFF master for important scans. If your only existing scan is a JPEG, keep it. Converting it to TIFF does not restore lost detail, and discarding a good JPEG while waiting for a perfect workflow is counterproductive.
Once the TIFF master exists safely on a backup drive, export JPEG copies for printing, sharing, or uploading without risking the underlying quality. If a JPEG copy turns out too small, too compressed, or unsuitable for a new use, you can export a better one from the TIFF master.
Estimate storage from your actual scan settings
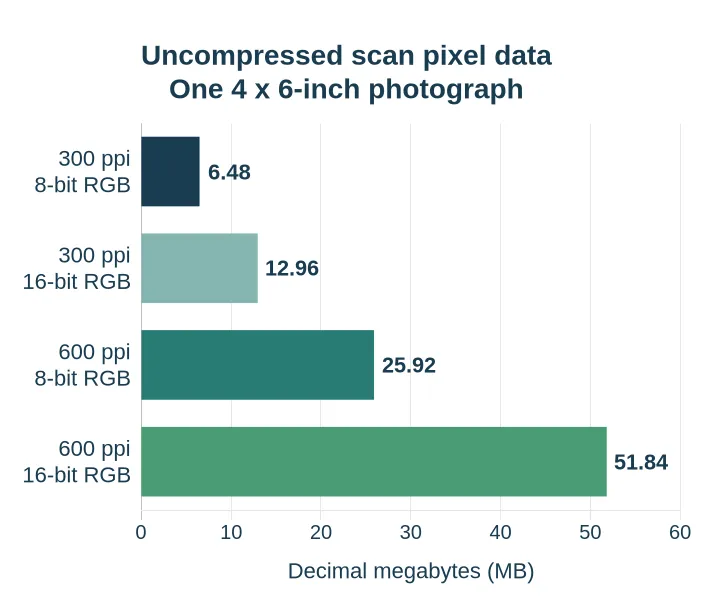
A 4 × 6-inch print scanned at 300 pixels per inch produces 1200 × 1800 pixels. At 8 bits for each of three RGB channels, the uncompressed pixel data is approximately 6.48 MB. At 600 ppi it is 2400 × 3600 pixels, or 25.92 MB: twice the sampling in each direction creates four times as many pixels.
These are calculations, not measured file sizes. Metadata, previews and layers add overhead; lossless compression may reduce storage. Sixteen-bit-per-channel RGB doubles the pixel-data requirement. Scan a representative group, check the actual files and multiply by your collection size before buying storage. See our scanning-resolution guide for choosing detail before format.
For predictable preservation, record the source photograph’s identifier, scan date, resolution, colour mode and any changes. Embed an appropriate colour profile where your scanner supports it. Export sharing copies to the receiving service’s specifications rather than overwriting your master. Adobe documents TIFF compression options, including lossless LZW and ZIP.
Use the photo-digitising workflow for handling and capture, then protect the files with a 3-2-1 backup. A TIFF on one ageing drive is less secure than a well-maintained JPEG with independently verified copies.
Separate the capture settings from the save settings
Before a large batch, record two sets of choices. Capture settings include optical sampling, colour mode, bit depth, exposure and any automatic corrections. Save settings include the container, compression, embedded colour profile and metadata. Choosing TIFF at the end does not undo destructive processing performed before saving.
For a representative sample, compare the unmodified capture with any automatic sharpening, colour restoration or dust-removal version. Keep a neutral master when the software supports it and save intentional corrections separately. A more saturated or sharper-looking preview is not proof that the scanner recovered more authentic information.
Sixteen bits per channel can give an editing workflow more tonal precision when the scanner supplies meaningful high-bit-depth data. It is not a guarantee of greater optical detail. Converting an existing 8-bit JPEG to 16-bit TIFF does not recreate tonal information that was never captured.
Keep colour handling predictable
Keep the appropriate embedded colour profile with the master where the software supports it. For sharing or printing, follow the destination’s requested profile and export settings. Converting to a destination profile is different from simply assigning a new profile name; an incorrect assignment can change the appearance without making a useful colour conversion.
If two applications show different colour, check profile handling and the display before resaving the master. Compare the same file in applications that support its profile and bit depth. Keep the original scan while investigating; a correction that makes one uncalibrated screen look right can make another use worse.
Make compatibility copies without flattening the only editing project
A layered restoration document and a simple scan master are different records. Keep the editable project if its layers matter, and make a separate flattened delivery copy when the receiving app or service needs one. Adobe’s current Photoshop guidance supports lossless LZW and ZIP TIFF compression and describes saving a flattened copy for compatibility. Its standard TIFF workflow supports files up to 4 GB; check an oversized layered project’s application and format requirements rather than assuming any .tif will work everywhere.
Test the intended recipient’s actual workflow with a permitted sample. Check that the image opens at full size with the expected orientation, colour, transparency and page or layer behaviour. An email thumbnail or successful upload does not establish that a book service or another editor can use the master.
Keep the application name, project version and exported-copy role in the file index when those details are needed to reopen the work.
Use a small export test before committing thousands of files
| Check | What a useful test confirms |
|---|---|
| Master compression | TIFF is uncompressed or uses the intended lossless option, not JPEG compression |
| Pixel dimensions and bit depth | The saved file matches the chosen capture rather than a reduced preview |
| Colour and metadata | Profile, orientation, identifiers and known dates survive the save |
| JPEG export | Dimensions, compression and profile suit the receiving print or sharing service |
| Independent copy | A file restored from backup opens and matches the intended version |
Include both a detailed photograph and one with smooth gradients, such as a sky, in the test. Compression damage can be less obvious in a small preview than around edges or in large smooth areas. Check at a meaningful viewing size and retain the master rather than repeatedly exporting from an already compressed sharing copy.
Do not repeatedly open and resave a JPEG merely to organise it. Ordinary unchanged copying preserves the file. Editing, resizing and saving with lossy encoding can change pixels; particular lossless metadata operations depend on the software. Keep the original JPEG when it is your only scan, even if you also make a TIFF working copy.
Plan storage for the whole workflow
The existing chart shows uncompressed RGB pixel data for one 4 × 6-inch scan. For 1,000 scans at 300 ppi and 8 bits per channel, 6.48 MB each implies 6.48 GB decimal of pixel data before overhead. The same count at 600 ppi implies 25.92 GB. A separate complete backup doubles those stored amounts before adding edits and JPEGs.
Actual files may be smaller with lossless compression or larger with layers, previews and metadata. Keep separate planning averages for plain scans, layered restoration projects and sharing exports. A compression ratio from one smooth image is a poor estimate for a mixed collection, and a backup plan needs the master set rather than just the small delivery copies.
Agree a restoration or print handoff in file terms
Before sending a collection, ask which source formats, bit depth, profiles and dimensions the recipient accepts, whether it needs layers, and what it will return. Keep the source scan and record which files were sent. If a provider supplies only a finished JPEG, do not assume you will also receive a layered project or an unaltered master.
| File role | Check before accepting | Keep separately |
|---|---|---|
| Capture master | Expected dimensions, crop, bit depth, profile and compression | Original source scan and its identifying record |
| Restoration project | Required layers and compatible application/version, where agreed | Unaltered capture and flattened viewing proof |
| Print or book export | Requested dimensions, crop, colour handling and visible captions | Full-frame master so another layout remains possible |
| Family sharing copy | Readable subject and permitted metadata/audience | Private master with the complete context |
If a JPEG export is too large for a destination, make another export from the master using that destination’s size and quality requirements. Change one setting at a time, inspect a detailed crop and a smooth gradient, and record the accepted version. Do not use a universal JPEG quality number across unrelated applications or repeatedly recompress the only sharing copy.
Reopen a returned sample from independent storage before approving the full delivery, then reconcile the file IDs with the items expected.
Keep a stable photo identifier across the master and derivatives, for example PHOTO-0042-master.tif and PHOTO-0042-print.jpg. Record the source print, capture date and settings in an index. Keep an unknown event date unknown; a scan’s creation timestamp is not necessarily the date the original photograph was taken.
Next steps: protect the master and make copies for use
For important scans, keep an uncompressed or losslessly compressed TIFF when the capture software and storage plan support it. Preserve an existing good JPEG when that is what you have. Export the dimensions and quality needed for each use from the best retained source, keep editing versions separate, and verify recovery from independent storage before considering the archive finished.
Frequently asked questions
Is TIFF always lossless?
No. TIFF supports multiple compression methods. Choose uncompressed, LZW or ZIP when you need to preserve the current pixels without lossy compression. TIFF with JPEG compression is lossy.
Does copying a JPEG reduce its quality?
No. Copying or backing up an unchanged JPEG does not recompress its image data. Repeated editing and lossy re-encoding can add damage.
Can a JPEG be a good scan for printing?
Yes. A high-quality JPEG with sufficient pixel dimensions can make a good ordinary print. A lossless master is more flexible when substantial editing or repeated exports are likely.
Will converting a JPEG to TIFF restore detail?
No. It preserves the decoded image for a new workflow but cannot recover detail already lost to compression or a poor scan. Keep the original JPEG too.
Should I scan every photo as TIFF?
Prioritise irreplaceable photographs and likely restoration projects. A high-quality JPEG may be practical for a large everyday collection. Choose a workflow you can consistently verify, organise and back up.
Should I flatten a layered TIFF before sending it to someone?
Check what the recipient needs. Keep the editable project if its layers matter and make a separate flattened delivery copy where required. Test that copy in the receiving workflow without replacing the only project or unaltered scan.
What should I check when restored photos are returned?
Match the expected item IDs, dimensions, crop, colour handling and file roles. Confirm whether the delivery includes the unaltered capture, layered project or only a finished export. Open a sample and keep the source scan independently.
Sources and image credits
Adobe’s TIFF compression, layers and compatibility guidance; Library of Congress scanning guidance; US National Archives family digitisation guidance. The original photograph introduces archival preparation. The file-role matrix, derivative diagram and calculated storage chart distinguish masters, useful copies and storage requirements.
Related Posts


Share this article

Stuart Kerr Spindlow is Pixoneye’s Publisher, Editor-in-Chief and Lead Product Reviewer. He tests consumer products and leads coverage of practical gadgets and personal-media preservation. His reviews focus on usability, limitations, value and the trade-offs that matter when choosing a product. Read Stuart’s full profile.
Leave a Reply