

Quick Answer: Use a working compatible VCR and an analogue capture device or standalone recorder to create a digital file. Keep the best capture, make a compatible MP4 viewing copy, then copy it to USB. Test the actual file on its intended TV or computer; a USB drive stores video but does not read the tape or guarantee playback.
Old VHS tapes can deteriorate over time. The tape may stretch, colors may fade, and the plastic shell can break after years in storage.
Converting VHS to USB or MP4 involves playing the tape through a capture device, saving it as a digital file, and then copying that file to a flash drive or computer. This guide will show you how to convert VHS to USB or MP4 effectively.
This guide explains the main methods, from a DIY setup with a capture card to using a standalone recorder or a VHS transfer service. It outlines the equipment needed and common issues with files and playback.
It is aimed at anyone with a collection of family tapes who wants a straightforward plan without technical jargon.
Key Takeaways
- There is no single cable or device that converts a tape directly to USB; the tape must be digitized first.
- Your choice between a computer setup, a standalone recorder, or a mail-in service depends on tape count, tape condition, and how much control you want.
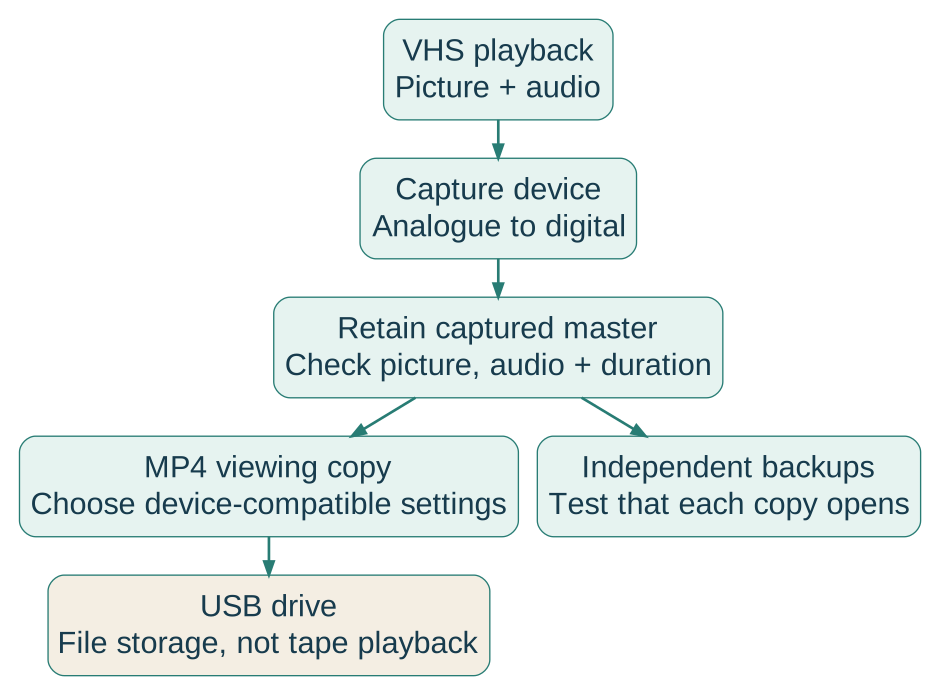
- Keep the capture master separately from an MP4 viewing copy, and maintain independent verified backups. The MP4 format alone does not protect against loss.
Choose the Right Preservation Route
There is no universal method for converting VHS tapes to digital. The best option depends on how many tapes you have, your desired level of control over quality, and your comfort with basic technology.
Three main options are common: a computer capture setup, a standalone recorder, and a mail-in VHS conversion service. Each has its own balance of cost, effort, and results.
Use a Computer Capture Setup for More Control
This method uses a VCR connected to a computer through a video capture device, such as a USB capture card or video capture adapter. Recording software on the computer saves the video as a digital file while the tape plays.
Pros:
- Can offer more control when the capture hardware and application expose the settings you need.
- May work with software such as OBS Studio when the device and driver explicitly support it.
- Potentially economical when reliable playback equipment, storage and enough time are already available.
Cons:
- Requires time for setup and troubleshooting.
- Needs a working VCR and enough computer storage.
- Transfers happen in real time; a two-hour tape takes two hours.
This option suits people with several tapes who are comfortable with basic technology.
Choose a Standalone Recorder for Simpler Transfers
A standalone VHS-to-digital converter does not require a computer. Connect the VCR to the device, insert a USB drive or SD card, and press record.
These devices often include a small screen to preview the recording. They are easier to use but usually offer less control over video quality.
Consider a Mail-In Service for Small or Valuable Collections
A VHS conversion service digitizes tapes for you. You send in your tapes, the service digitizes them on professional equipment, and returns the files on a USB drive or via cloud download.
iMemories is my first convenience choice for supported US family tapes; Legacybox and Forever Studios are contextual alternatives to compare against the same inventory and output requirements. Pricing is usually per tape or per package, so check the provider’s current rates.
Before choosing a service:
- Confirm pricing structure.
- Check turnaround times and shipping insurance.
- Read reviews for reliability and support.
- Ask about the return of your original tapes.
A consumer service can suit a small clean collection or valuable footage when suitable handling is confirmed. Damaged or contaminated tapes need a specialist that explicitly treats those conditions.
Gather the Equipment Before You Start
Before starting, make sure you have a working VCR, the right cables, and a computer with enough storage. Missing or faulty equipment can delay the process.
Check Your VCR and Tape Playback First
Use a working VHS player in sound mechanical condition. Compare tested condition, supported television standard, outputs and return terms; an untested VCR can put tapes at risk.
Test a tape you don’t mind losing before starting the full process. Look for a stable picture and clear audio. If multiple tapes show a rough picture, the issue may be the VCR rather than the tapes.
Select the Best Video and Audio Connections
Most VCRs use RCA cables (red, white, and yellow) for audio and video. Some setups use S-video cables for better picture quality, but you’ll still need separate audio cables.
For camcorder tapes, identify the recorded format before choosing connections. Analogue Hi8 follows an analogue capture route; a digital MiniDV recording is better served by a supported native transfer where practical. Use our separate Hi8 and MiniDV guides rather than assuming every small cassette uses this VHS workflow.
Confirm Computer and Device Compatibility
Check whether the capture device and its drivers support your version of Windows or macOS. Use the USB port type and speed specified by the device manufacturer; many standard-definition capture devices use USB 2.0 successfully, so USB 3.0 is not automatically required.
Required storage depends on recorded duration, codec, bitrate and whether you keep a higher-quality master as well as an MP4 copy. Capture a short test, check its file size per minute and estimate the collection from the actual settings.
Capture the Tape to a Computer or Drive
Once your equipment is ready, the capture process is similar across devices. Connect the hardware, run the recording software, and save the result.
Connect the VCR to a USB Capture Device
Connect the VCR’s RCA or S-video output to the capture device, then connect the device directly to a compatible USB port specified by its manufacturer. Confirm current operating-system and driver support before buying a particular capture device.
Compare the exact capture device’s supported systems, inputs, audio handling and output settings before deciding whether its price represents good value.
Record Footage With Capture Software
Use the device’s supported application or capture software explicitly compatible with its driver and your system. Select the connected video and audio inputs, begin recording just before the footage you want, then play the VCR. Leave a little lead-in rather than trying to synchronise two buttons exactly.
- Recording happens in real time; a two-hour tape takes two hours.
- Check the recording preview for any issues early in the process.
Save Directly to USB or SD Storage
Standalone recorders save directly to a USB drive or SD card during recording. This skips the computer step but usually offers fewer quality controls.
After capturing to your computer, copying files to USB drives is straightforward. Be aware of file size limits, which can cause problems during transfer.
Choose a Format and Store It Safely
The file format affects compatibility, file size, and ease of editing or sharing.
When MP4 Is the Sensible Default
MP4 files using H.264 compression are widely compatible with most devices. Size depends on total bitrate and recorded duration. Estimate it from a representative saved sample using your settings.
For everyday viewing and sharing, H.264 in MP4 is a practical access format. Retain the best practical original capture separately.
When MOV or AVI May Be Useful
AVI, MOV and MP4 are containers rather than fixed quality levels. File size and retained detail depend on the codec, bitrate, colour sampling and capture settings inside the container. Choose a format supported by the editing and preservation workflow rather than assuming AVI is automatically higher quality.
Keep the highest-quality practical capture as the preservation master and create a separate MP4 access copy for normal viewing and sharing. The National Archives distinguishes preservation copies from access copies.
Create More Than One Backup Copy
Do not rely on a single flash drive for your digitized tapes. Drives can fail or get lost.
Best practice:
- Keep one copy on a USB drive for sharing.
- Keep another on a computer, external hard drive, or cloud storage.
Some flash drives use FAT32, whose individual-file limit is just below 4 GiB even when free space remains. Check the receiving device’s supported file systems before choosing exFAT or NTFS for larger files. Back up the drive before any formatting, which erases existing contents. Keep the master elsewhere while preparing a viewing drive.
Improve Capture Quality
Capture quality depends on the source tape, equipment, and settings. Severely degraded tapes cannot be fully restored with software.
Set the Correct PAL or NTSC Standard
US VHS commonly uses NTSC at approximately 29.97 interlaced frames per second, while UK and much European VHS commonly uses PAL at 25 interlaced frames per second. Match the VCR, capture device and software to the tape’s television standard to avoid colour, timing or motion problems.
Check your device’s settings before recording.
Address Interlacing, Colour and Tape Noise
VHS footage is interlaced, which can cause horizontal lines on digital screens. Deinterlacing filters in editing software can help.
Aging tapes may show color issues or noise. Some editing tools offer automated denoising and color correction, but results vary by tape condition.
Know When Editing Is Worth the Extra Work
Basic color correction and denoising can improve faded tapes. For clean captures of family footage, this step is often unnecessary.
Advanced enhancement takes significant time and may not always be needed.
Avoid Common Problems and Decide When to Outsource
Converting VHS to digital can have challenges, such as hardware issues or unplayable tapes. Understanding common problems can help you decide whether to continue or seek professional help.
Fix Missing Video, Audio and Device Detection Issues
If the computer does not detect the capture device, connect it directly to a compatible USB port, install the manufacturer’s current driver where required and check the software’s selected input. Missing audio can result from loose cables, an incorrect audio input or an unsupported driver.
A poor picture can originate in the tape, playback machine, signal path or capture settings. First compare a clean, low-value compatible test tape and check the selected input. Do not repeatedly run an important or physically distressed tape through untested VCRs to diagnose it.
Protect Original Tapes Before Sending Them Away
Before sending tapes, inspect only the cassette shell and visible tape path. Do not play or rewind a mouldy, damaged or unfamiliar tape solely to prepare it for shipping. Keep each cassette upright in its case and follow the provider’s packing instructions; see the National Archives videotape-storage guidance.
Check the service’s shipping insurance and return policy. Photograph tape labels before mailing in case of loss.
Make the Final Choice Based on Time, Cost and Tape Condition
| Situation | Better option |
|---|---|
| Clean tapes, reliable playback equipment and enough time to supervise real-time capture | A tested computer capture setup may suit |
| Small collection, want no setup | Standalone recorder or service |
| Tapes showing physical damage or contamination | Specialist assessment before playback |
| Irreplaceable footage with no other copy | A provider with confirmed format, condition handling and agreed deliverables; assess shipping risk too |
DIY cost includes a reliable player, capture hardware, cables, storage and your time; calculate the complete setup. Services charge per tape or per package, so compare convenience with overall cost.
Use a test capture to set the whole job
Write down the tape identifier and television standard before selecting software settings. A US NTSC tape and a UK PAL tape need a compatible player as well as the correct capture setting; changing only an export preset cannot repair incompatible playback. Preserve the original picture shape instead of stretching a family recording to fill a widescreen display.
Connect the VCR’s output, not its input, to the capture device. Composite video uses the yellow connector; red and white carry audio. If both ends offer S-Video, it separates the picture components at that connection but still needs separate audio cables. Select the matching source in the application and make sure its audio source is the capture device rather than the laptop microphone.
Record a section with motion and speech, stop and play the saved file in a separate player. Check the left and right audio, clipping, lip sync and picture edges. A good preview alone does not prove the recording contains audio. Before a long tape, verify the destination folder, available disk space and the application’s dropped-frame or recording-status display.
Keep the best practical original capture before denoising, cropping, deinterlacing or resizing. If your application records interlaced video, preserve its field order correctly; a poor deinterlacing setting can damage motion. Make a progressive MP4 viewing copy separately and compare moving scenes before exporting the whole collection.
Estimate storage with a real sample. For an access file at 8 megabits per second total bitrate, one hour is approximately 3.6 decimal GB: 8 × 3600 ÷ 8 ÷ 1000. That is an illustration, not a recommended capture setting or measured result. Your master codec may need much more space. Include both master and viewing copies in the estimate.
Copy a finished file to the intended USB drive and play it on the actual television or computer. A device may support MP4 but reject a particular codec, audio format or file system. FAT32 has an individual-file limit just below 4 GiB; exFAT removes that limit but must be supported by the playback device. Back up existing files before reformatting, because formatting erases them.
Eight full two-hour tapes require at least sixteen hours of playback, plus setup, checking and copies. Compare that time with a complete service quote rather than a dongle’s price alone. The National Archives recommends preservation and access copies; a convenient MP4 should not automatically replace your best capture.
Diagnose USB playback failures
If a file plays on the computer but fails on a TV, first preserve that working file. Re-capturing the tape is usually unnecessary until you establish a fault in the recording itself. USB playback involves several independent compatibility checks.
| Layer | What can fail | Useful test |
|---|---|---|
| Drive detection | Unsupported port, partition, capacity or file system | Try a backed-up spare drive formatted only as the exact player manual permits |
| File copying | An individual-file limit even with ample free space | Check the file’s size and drive format before splitting a viewing copy |
| Video decoding | Unsupported container, codec, profile, dimensions or frame rate | Export a short sample to the player’s stated specification |
| Audio decoding | Unsupported audio format or channel arrangement | Use a speech sample and check sound on the intended player |
| Copy integrity | Incomplete transfer, removal before writing finishes or a failing drive | Open the copied file from the USB drive, including a late section |
FAT32’s individual-file limit is just under 4 GiB. A large-capacity FAT32 drive can therefore reject a single long recording while smaller files copy normally. exFAT can accommodate larger files, but support on the destination TV must be confirmed. Back up a drive before formatting it; formatting removes its contents.
MP4 names a container, not one universal playback specification. Renaming AVI to MP4 does not convert the video, and changing a filename cannot add an unsupported audio decoder. Read the exact TV or media-player manual and make a short compatible derivative before exporting the whole collection.
When splitting a viewing copy to meet a player limit, number segments in order, avoid losing footage at the join and keep the complete master separately. Check the first and last moments of each segment on the actual destination device. Include a plain-text index if relatives need help matching files to tape labels.
Microsoft’s file-system comparison documents storage limits. Sony’s USB playback guidance illustrates why container support alone is insufficient; your particular model’s manual remains the compatibility reference.
Prepare a viewing drive without sacrificing the master
First keep a verified copy of the capture on your main storage and another independent backup. Check what is already on the USB drive before changing it. If a recorder or TV asks to initialise or format a drive, stop until its existing contents are backed up and you understand whether the new format is intended for playback or device-specific recording.
Export a short sample from the master in the intended viewing format. Test speech, motion, picture proportions and seeking on the actual TV. Once that works, export the full programme using the same settings and check the finished copy again. A short sample cannot reveal every long-file or running-time limit.
If the target device requires smaller files, make clearly numbered viewing segments while retaining the complete master. Check the join points for missing or duplicated footage. Splitting files for compatibility is different from deleting scenes or recompressing the only surviving capture.
Use simple consistent names such as VHS-003-part01.mp4 and keep a separate index of the original label, known event and date. Leave uncertain dates in the notes. Eject the drive through the computer’s normal safe-removal procedure after copying, then test a file from the drive rather than the original folder.
A standalone recorder needs the same acceptance checks
Confirm the recorder’s actual analogue input, audio connection, supported USB or SD storage, encoding options, file-splitting behaviour and recording limits before buying. A small preview screen does not establish the resolution or quality of the saved file. An HDMI-only recorder cannot directly accept an ordinary VCR’s composite output.
For a long tape, watch the recording status and check the saved beginning, middle and end. Some units split a recording into multiple files; keep every segment and check their order. Account for blank sections, tape stops, clock errors and any on-screen display burned into the capture.
A standalone recorder can be a convenient access-copy route, while a configurable capture workflow may suit someone requiring a better preservation master. Ask for the actual saved-file specification rather than relying on “HD” on the packaging. Upscaling an analogue VHS signal does not create authentic high-definition source detail.
Finish the archive, not just the first USB copy
Reconcile every cassette to its files, record playback faults and check overall duration. Keep the unmodified capture before enhancement or editing, label viewing exports separately and preserve the tape-to-file index. For service work, ask which delivered file is the master and whether an unenhanced version is available.
Use the USB stick as a viewing or delivery copy alongside independent storage. A synchronised folder can propagate accidental deletion; verify that your backup arrangement can restore an older or deleted file. Open restored samples periodically and migrate files before an old drive or account becomes inaccessible.
For a family handoff, include the MP4s, a readable index and brief playback instructions for the receiving device. Share private footage only with the intended people and keep public-upload decisions separate from preservation. The source tapes should remain in protective cases in a stable environment after digitisation.
Final Verdict: What Is the Best Way to Convert VHS to USB or MP4?
A computer-based capture setup is usually the best DIY option when you have a reliable VCR, several clean tapes and want control over the recording settings. A standalone recorder is simpler, but it normally offers fewer controls over compression, deinterlacing and the resulting file quality.
MP4 is the most practical format for everyday viewing and sharing. A USB drive is only a device for storing or delivering that file; it should not be treated as the archive itself. When possible, retain a higher-quality master file and create a separate MP4 copy for normal use.
A consumer service can be practical for a few clean tapes, no working VCR or a valuable collection. Mould, sticking or physical damage require a specialist that explicitly assesses and treats those conditions. Compare suitable providers in our guide to the best VHS-to-digital services.
For US families seeking a convenient mail-in transfer with optional family viewing, iMemories is my first choice for supported tapes. It accepts common home-video formats, provides downloadable digital files and makes converted footage convenient to view and share. Read our full iMemories review for its process, pricing structure, delivery choices and limitations.
Review the complete itemised quote before approving an order. Shipping, return delivery, long-tape charges, physical outputs, continuing cloud access and optional enhancement can increase the final cost. After conversion, keep the files in at least two separate storage locations rather than relying on one USB drive.
Frequently Asked Questions
Can I connect VHS directly to a USB stick?
No. A compatible VCR must play the recording and a capture device or standalone recorder must digitise it. The USB drive stores the resulting file.
Can I convert VHS without a computer?
Yes, a compatible standalone recorder can save a VCR’s output to supported storage. It still needs a working VCR, video and audio connections, and a check of the finished file.
Why is there a picture but no sound?
Check the audio connections and select the capture device’s audio input. S-Video carries no audio. Play a saved test, not only the preview.
Which MP4 settings should I use?
Choose a codec, picture size, frame rate and audio format supported by the receiving device, and test motion and sound. Preserve the best practical original capture separately.
Why will a large video not copy to USB?
The drive may use FAT32, which limits an individual file to just below 4 GiB, or lack space. Check file system and device compatibility. Formatting erases existing data.
Can any mail-in service treat a damaged tape?
No. An ordinary transfer service may not treat mould, sticking or physical damage. Confirm specialist assessment before playing or shipping an affected cassette.
Sources and image credits
iMemories SafeShip kit. Image: iMemories.
Related Posts


Share this article

Stuart Kerr Spindlow is Pixoneye’s Publisher, Editor-in-Chief and Lead Product Reviewer. He tests consumer products and leads coverage of practical gadgets and personal-media preservation. His reviews focus on usability, limitations, value and the trade-offs that matter when choosing a product. Read Stuart’s full profile.
Leave a Reply